
Rod Uding (@RoughDesigning) discovers a drawing with over 100 revisions. Short but interesting Google Plus Posting here.
Just came across the most revised drawing I have ever seen.
Rod Uding (@RoughDesigning) discovers a drawing with over 100 revisions. Short but interesting Google Plus Posting here.
Just came across the most revised drawing I have ever seen.
As noted in a previous article, revision cloud is a new annotation in SolidWorks 2013. Well, here’s a little trick not mentioned in the What’s New that you can use on revision clouds once you’ve placed them on your drawing. Highlight the revision cloud and goto Tools pulldown>Sketch Tools>Rotate. The Rotate tool will allow you to rotate your revision cloud annotation.

Rectangular revision cloud just minding its own business.

Gah! Someone has started the Rotate tool and is rotating the revision cloud.

Well, the cloud was successfully rotated and just left there to highlight the change at its new angle.
Revision clouds is a new annotation type in SolidWorks. The main purpose for revision clouds is to allow you to call attention areas where a revision was made on a drawing. Though revision clouds are not the same as comment clouds in eDrawings, you may also want to use it to highlight comments for redlines, if you wish. Revision clouds are likely the most entertaining annotation, as you can also get artsy and make actual cloud shapes just for the fun of it.
 Making a revision cloud is easy. Open up a drawing in SolidWorks 2013, goto the annotations tab on the CommandManager. Nearby Revision Symbol, you’ll find Revision Cloud. The PropertyManager allows you choose cloud type, Rectangle, Ellipse, Irregular Polygon and Freehand. You can also control the maximum size of the cloud puff radius, line type, line thickness and layer. Color can also be controlled via the layer or by using the Line Color tool in the Line Format toolbar. Here’s some examples.
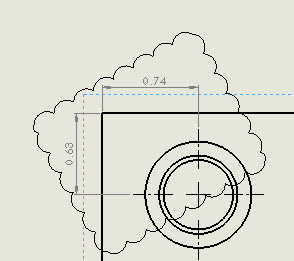
 Elliptical cloud around a dimension

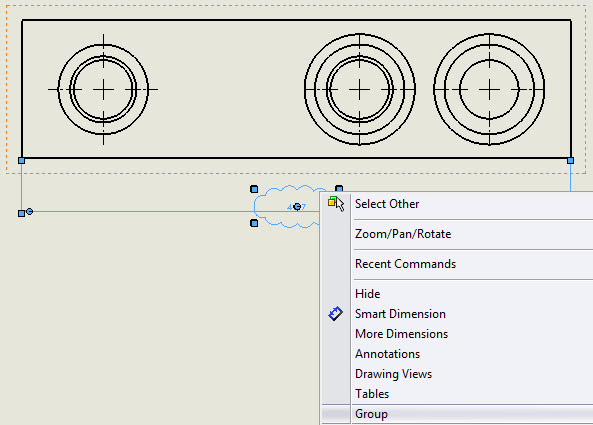
You can group the dimension and cloud together

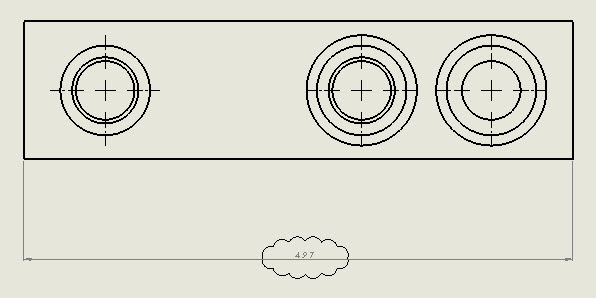
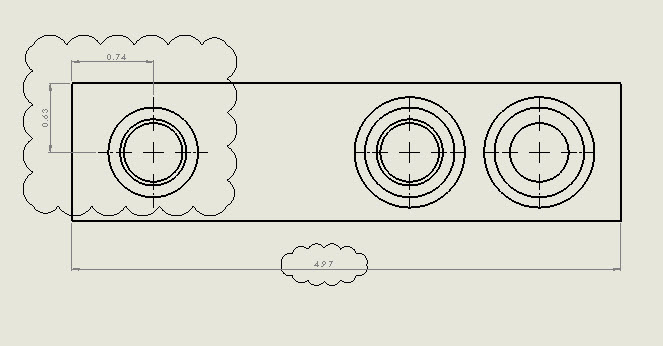
Once grouped, the cloud and dimension will move together

Example of a rectangular cloud
 Example of an irregular polygon cloud
 Example of a freehand cloud with a different line style
Whether using actual drawings or relying on the model, and whether using a highly controlled documentation system or nearly completely uncontrolled, one will find revisions are necessary. It is important to use them consistently. It is important to make sure each time another person sees a drawing or model, they understand which revision is in front of them. It is important not to reuse revisions. If there is a working copy that is incomplete, preliminary or draft, then stating such directly on the document is very important.
Also important is avoiding interpretation confusion. If using letters to represent revision iterations, avoid using letters that resemble numbers or that can have alternative meanings. ASME Y14.35M-1997 states that I, O, Q, S, X and Z should not be used as revision letters. In fact, other ASME engineering drawing standards also forbid the use of these letters for other purposes as well. The reason is that I, O, Q, S, and Z all can be misinterpreted as numbers 1, 0, 5 and 2. When X is used, it looks like a field that requires further input.
These rules where written before the Information Age (wiki) and our reliance on computer databases, back when documentation relied on handwriting. However, these rules are just as important in our current age as they have ever been before. Many different types of computer fonts exist. What looks like a 1 in one font will look like an I in another. Even with my 20/20 vision, I will confuse S’s with 5’s in small sizes in certain common fonts. Also, transcription errors still enter the picture, as a human who does not have direct access to the electronic database is usually involved at some point.
PDMWorks (soon to be renamed to SolidWorks Workgroup PDM by SolidWorks Corp) automatically assigns revisions to documents when they are checked-in. There are options for the PDMWorks Administrator to use dumb ranges, or to establish a list of revision identifiers from which to pull. Unfortunately, when using letters, PDMWorks does not automatically disregard the taboo letters. So, I’ve made an Excel file with a list of allowed revision letters. It can be copy-and-pasted directly into PDMWorks VaultAdmin’s Revision Scheme Listing fields. It is available here: Allowed Revision List.
Part 2 of this article series will address using PDMWorks ability to automatically revise drawings upon check-in.
I am sometimes surprized by the limited the adoption of the SolidWorks Revision Table. This is a powerful tool for drawings within SolidWorks. The Revision Table allows the user to create a drawing template with an easily updateable revision block already included. The user doesn’t have to use a potentially unstable Excel inserted OLE. They also do not need a drawn revision block that requires significant labor in order to update and maintain.
The SolidWorks Revision Table is easy to insert in SolidWorks 2008. With a drawing open, just go to Insert pulldown>Tables>Revision Table. Within the Revision Table Pane, pick the appropriate revision template. Choose any desired options for the table. Choose OK. The Revision Table will automatically appear in upper right corner. Save the drawing template for future use. (See Help for instructions to place the Revision Table at other locations on the drawing. Also, more steps are required in 2007 and prior; but, they are intuitive to follow and provide more on-screen control over the table’s location.)
Custom Revision Tables can be created to suit the companies specific needs. Right click on the table to use the RMB menu to access functions that provide methods to modify the table. When modifications are complete, use the RMB menu Save As option to save the new table as a table template for future use.
To add a revision, simply right click on the Revision Table. Choose Revisions>Add Revision. A new revision row will appear with the next revision inserted. Simply double click any field to add or modify its value. LMB click outside of the table to set the edits.
Of course, there is a simpler way to add revisions to the Revision Table! I’ve created a macro that provides a form which allows the quick addition of revisions to the Revision Table. It’s called RevBlockControl. It is much faster than directly creating and entering all the rows and values. It has been recently updated, so if you already use this macro, please consider using the latest version.

To use the macro, place it in the macros folder under the SolidWorks folder. If it doesn’t exist, create it. Within SolidWorks, assign a custom key stroke to the macro and/or create a toolbar icon location for it.
It can be used for a variety of revision table set-ups, including standard recommended ASME types. It is limited to 5 columns, though it is customizable without editing the code or a complex .ini file. If editing the code is desired, everything is spelled out with descriptions for easy of use. In fact, the code can be quickly edited to allow the macro to drive the drawing’s “Revision” custom property. Additionally, there is a small .ini included in this current version. It is simply a list of initials used by the Rev By field. Edit it with NOTEPAD to add and delete names that will automatically appear within the Rev By field.
Even without the RevBlockControl macro, the easy of use of the SolidWorks Revision Table is well worth the few minutes of effort to set it up on a template. With the RevBlockControl macro, adding revisions to a Revision Table is so fast that it is almost effortless when compared to other type of revision blocks.
A while ago, I created a SolidWorks macro that allows the user to quickly add new revisions to a drawing’s revision block table. It’s called RevBlockControl. I’m fairly proud of this macro because of its flexibility and easy of use. Within SolidWorks, it can be used for any ASME Y14.35M-1997 compliant revision block table and even supports not so compliant layouts. One cool feature is that it supports revision block tables that start either from the top or bottom of a drawing. The macro even provides an option to update a revision custom property (though the name of the custom property is stored in the code). This one function, of course, is not as useful for those who update their custom properties within the part model. Another requested feature that was included is the addition of buttons to insert some common special characters like line feed and the +/- symbol.

This macro will not work with manually drawn or excel based revision blocks. It only works with a SolidWorks revision block table. One area of the macro needing improvement is that of settings. Currently, the settings are stored within the code itself, or user selected each time the macro is run. Also, it does not validate if the current revision block table matches the user selected settings. However, it does have clear instructions within a detailed help area that will allow even a novice user to quickly modify the code to establish their settings preferences. There is currently only one known bug involving the form X button. Use the actual Cancel button if quitting the macro without making changes to the revision block table.
One big plus of the macro is that it has a simple preview area that allows the user to visualize how their revision entry will appear. The preview updates to match whatever settings are selected, and any data entered into the input fields.
The macro may be downloaded here: RevBlockControl. It may be freely distributed. For additional details, see its .txt file and its help area. Feedback is always welcome.