Sometimes it’s the little new things (~part II) in SolidWorks 2013: Watermarking

This entry is part 7 of 12 in the series New in SolidWorks 2013

There’s been a long trail of discussions on the topic of adding watermarks to SolidWorks drawings.   For one reason or another, watermarks are seen by some as necessary in drawings.  The starting point of the conversion can be roughly traced back to the SolidWorks Forum in 2006.   In December 2007, I did one article that incompletely addressed the need.  If you just needed text to show up on your sheet format, you can review the first article.

Then, a question was asked at the first Stump the Chumps presentation at SolidWorks World 2008 about how to add watermarks to drawings.  No answer was given at that presentation (the chumps where stumped).

Soon after SolidWorks World 2008, Ben Eadie (one of the stumped chumps) found an About SolidWorks article that discussed various aspects of this topic.  (The article appears to have been maintained/updated since then.)     Around that time, I also wrote a detailed article about how to link your custom properties to your watermark and provided a trick  to get the watermark note to appear underneath elements on the drawing sheet.  Linking custom properties to the watermark allows the watermark value to be controlled by Enterprise PDM workflows.

OK, so what was the trick to getting notes to appear underneath drawing elements? If you created a block of an annotation note on your sheet format, that note block will appear under your drawing (without obscuring drawing content).

In Solidworks 2013, you no longer need to use that trick to get your sheet format note to appear underneath drawing elements.  There is now a command that resides in the right-click menu for each annotation note on the sheet format called “Display Note Behind Sheet”.  When checked, the  note is placed underneath drawing view elements on the drawing sheet, including other annotations, dimensions and model geometry in both HLR/HLV and shaded modes.

Display Note Behind Sheet is a checkmarked command in the
right-click menu for any annotation note on the sheet format.
.

With the checkmark set on the note in sheet format, the
note appears under all drawing view elements.
.
Uncheckmarking the option will apply standard ordering
of drawing elements, with geometry obsured by
the note.

What’s News in SolidWorks 2013: Revision Clouds

This entry is part 4 of 12 in the series New in SolidWorks 2013

Revision clouds is a new annotation type in SolidWorks.  The main purpose for revision clouds is to allow you to call attention areas where a revision was made on a drawing.  Though revision clouds are not the same as comment clouds in eDrawings, you may also want to use it to highlight comments for redlines, if you wish.  Revision clouds are likely the most entertaining annotation, as you can also get artsy and make actual cloud shapes just for the fun of it.

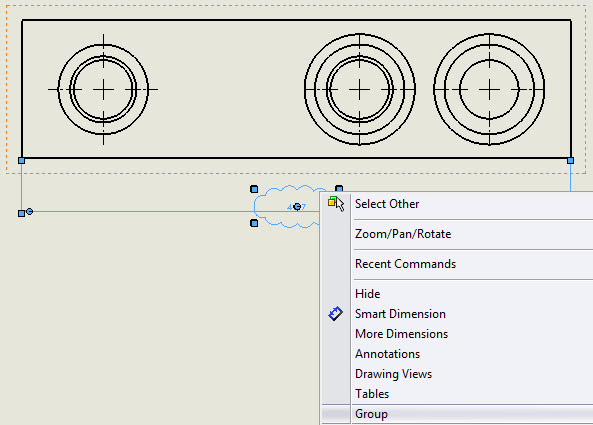
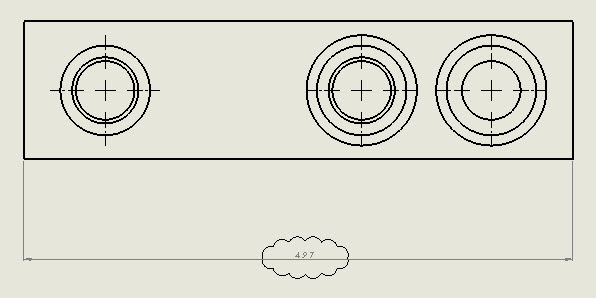
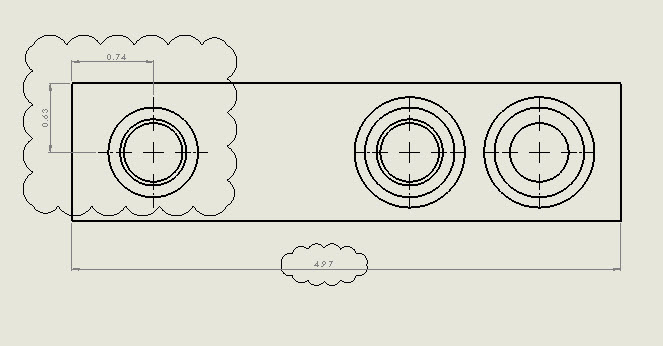
Making a revision cloud is easy.  Open up a drawing in SolidWorks 2013, goto the annotations tab on the CommandManager.  Nearby Revision Symbol, you’ll find Revision Cloud.  The PropertyManager allows you choose cloud type, Rectangle, Ellipse, Irregular Polygon and Freehand.  You can also control the maximum size of the cloud puff radius, line type, line thickness and layer.  Color can also be controlled via the layer or by using the Line Color tool in the Line Format toolbar.  Here’s some examples.

Elliptical cloud around a dimension


You can group the dimension and cloud together


Once grouped, the cloud and dimension will move together


Example of a rectangular cloud

Example of an irregular polygon cloud

Example of a freehand cloud with a different line style

Sometimes it’s the little things or Freedom to zoom around (New in SolidWorks 2013)

This entry is part 5 of 12 in the series New in SolidWorks 2013

SolidWorks had an interesting and small limitation  for a long time.  If you were editing an annotation note in the graphics area of your drawing (by double-clicking on it), you couldn’t use the mouse wheel to zoom in and out around the document.  Sure, you had access to increase and decrease zoom level using other means, but that would be focused on the center of the screen in both directions.  As such, linking your note to other annotations on other areas of your drawing usually involved planning one step ahead.

Starting with SolidWorks 2013, the mouse wheel now zooms in and out while you are editing an annotation note in drawings.  For example, if you are creating your general drawing notes and wish to add a link to a dimension in a drawing view at the other end of the drawing sheet, you can now simply zoom out with the mouse wheel, move the mouse cursor to the dimension and click it, then use the mouse and wheel to zoom back to focus the screen around the general notes while you are still typing.

Another use may be if your annotation note is not yet set to wordwrap and text is extending off the screen.  You can now quickly zoom out to see all of the text and set the note’s bounding box so that it wordwraps, then zoom back in to continue your edits.

This is going to be one of those little things that you won’t even notice when you use it.  You’ll prolly won’t think twice about it, acting as though this was the way it has always worked.

What’s New in SolidWorks 2013: Orientation dialog and View Selector

This entry is part 3 of 12 in the series New in SolidWorks 2013

Orientation Dialog Box

Switching between views in the SolidWorks modelling environment has always been a fairly painless exercise.  Press the SPACEBAR and choose your view, or use the Normal to command.  The Orientation dialog window has now been improved in SolidWorks 2013.   In addition to icongraphic layout, you can now create custom views and save them for reuse in different documents.

To save views for use in other documents, create a new view same as before using the New View button.  The view will then appear in the Orientation dialog box between the standard views and the view port buttons.  When you highlight that view, a save icon appears.  When saved, a globe icon will appear next to new view indicating that it is now available for use in other documents.


View Selector

Another cool addition to the Orientation interface is the View Selector.  To turn on the View Selector, start the Orientation dialog box and click on the View Selector button in the upper right next to the pin.  While this button is depressed, the View Selector will automatically engage when you launch the Orientation dialog box.

The View Selector allows you to quickly and visually select your next view orientation of the model between standard views.  It provides quick access to the opposite views too (the other side of each standard orientation).  That means you can quickly jump to the backside upper isometric view as easily and you can jump to the front view!


eDrawings Pro for iPad is here! ( #edrawingsforipad )

The Pro version of eDrawings on iPad, called eDrawings Pro for iPad,  is now available from the Apple App Store. This is a new app ($4.99 for 30 days or so, then $9.99 regular price) that goes beyond viewing SolidWorks documents. All of the same formats can be viewed (SolidWorks files, eDrawing formats and .DWG). Now, you have the ability to cut section views, measure, and read and write a variety of comments.  All images in this article are actual screen shots.

Sneak Peak of SolidWorks 2013: Routing along existing geometry

From SolidWorks Blog:

In SolidWorks 2013, The Auto Route tool includes an option to create a route based on existing geometry. To route along geometry, specify a start point, one or more planar faces, and an endpoint in the Auto Route PropertyManager. Routing automatically creates a route from the start point to the end point that runs parallel to the faces. You can specify the distance between the route and each planar face.